October 2020 – written by dogoncouch and edited by leaena.
Concept
This article assumes you have a working knowledge of public key infrastructure (PKI). For more information on certificates and PKI, see my article on how certificates work.
We’ve all heard that one should never click through a certificate warning, because it can be dangerous. The warning is there because the certificate presented by the server is not trusted; there could be some malicious person between you and the server, forwarding the connections and keeping a copy of the data. But sometimes a server has a self-signed certificate, or perhaps you need to connect to a server by its IP address instead of DNS name, and the certificate is only valid for representing the DNS name. In other words, you may have to connect to the server, even though your browser doesn’t recognize the certificate.
There is a way to get around this problem and connect securely to a server with an unrecognized certificate, provided you have access to log in to the server. You can verify the certificate from the command line, look at its fingerprint in your web browser, and verify without a doubt that the certificate your browser is seeing is the same self-signed certificate that is on the server, and is not forged.
Goal
Our goal is to verify a self-signed certificate that is on a Linux or BSD server, in order to connect to it securely. We will presume to have access to the server via SSH; without that, this won’t work. SSH is another protocol that requires verifying the server, so before we even get started with the certificate, we’ll verify the server using its SSH host key, which is similar to a certificate but a bit simpler.
We will presume to have access to the server via console to verify the SSH host key. Without console access, it would be necessary to get the SSH host key fingerprint from whoever set up the server.
Tools
All of the tools we’re using are open-source. OpenSSH is a secure shell (SSH) client, which we will use to connect to the Linux server that the certificate is assigned to. It’s installed by default on most Linux and BSD distributions, and on Mac OS. Newer Windows systems have a command line SSH client that works in a similar way; for older Windows systems, an SSH client will need to be installed, which is outside the scope of this article.
OpenSSL is a command line program that we will use to look at the contents of the certificate, and verify its fingerprint (a fingerprint is a hash of the certificate). It’s a very powerful, fairly complicated tool that is well worth spending some time to learn.
Firefox is my favorite web browser. It is made by the Mozilla foundation, a non-profit with a focus on consumer privacy and security, and descended from Netscape Navigator. Netscape was the organization that invented SSL (secure sockets layer), which is what originally made secure communication over the web possible. Firefox is free, open-source, and available for all popular operating systems. You can use another web browser (Chrome, for example) to check certificate fingerprints, but the process will be a bit different.
Process
Verifying the SSH Host Key
To verify the server’s SSH host key, we’ll log into it via console (or locally, by connecting a monitor and keyboard to it) to check the server’s host key fingerprint, and compare that to what we see when we try to connect to the server via SSH. The server may have a few different host keys using different algorithms; using a for loop in the command line is an easy way to get fingerprints for all of them. This one uses ssh-keygen, which is part of the suite of tools included with SSH, to print the fingerprints:
[dogoncouch@splunk ~]$ for x in `ls /etc/ssh/*.pub` ; do ssh-keygen -l -f $x ; done
256 SHA256:7iH88dxsnGwzyaassHiDEevhHZm6YILGOEAIhwMPni0 no comment (ECDSA)
256 SHA256:rdvv7kqfOEzIsY4YcmOGlfGIZP7YQJGbfJ/TipnShoU no comment (ED25519)
3072 SHA256:TmLw5Vj9Buf/cvDrYSbg1bt6XVhsp3MWpzkKnmZnUW0 no comment (RSA)
That is all we need from the server. I’m using my Splunk server (splunk.dogoncouch.net) for this example. Now we can go back to our client machine and connect via SSH:
dogoncouch@laptop:~$ ssh dogoncouch@splunk.dogoncouch.net
The authenticity of host 'splunk.dogoncouch.net (198.19.64.7)' can't be established.
ECDSA key fingerprint is SHA256:7iH88dxsnGwzyaassHiDEevhHZm6YILGOEAIhwMPni0.
Are you sure you want to continue connecting (yes/no)?
If we compare the fingerprint there to the fingerprints we saw above, we can see that the key we are seeing is one of the host key fingerprints on the server. That means we are connected to the right server, and we can type “yes” and then enter a password with confidence that someone isn’t stealing our credentials.
If the host key fingerprint we saw had not been one of the fingerprints we saw on the server, that would have meant something was wrong, and we definitely shouldn’t connect!
Verifying the Certificate Fingerprint
Before we start, it’s important to point something out; if you are using a pre-packaged certificate that came with some software, it probably isn’t unique. The same certificate, with the same fingerprint, is probably available for others to download as well. That means even if you can verify that the server is presenting the correct certificate, someone else could have set up the same certificate on another server in order to steal your credentials. It’s better to use a self-signed certificate you create yourself. See our article on how to create a certificate for more information on creating certificates.
Getting the Fingerprint via Command Line
First, we need to find the certificate. Popular places for certificates on a Linux system are /etc/pki/tls/certs/ in CentOS/RedHat-based distributions, and /etc/ssl/certs/ in Debian-based distributions. Certificates can also sometimes be found inside of a web server installation (for example, /etc/httpd/, /etc/nginx/, or /etc/apache2/). If you can’t find the certificate, you may need to ask whoever installed it or consult the documentation for whatever application the certificate is installed on.
In our case, we’ll be verifying a certificate used for a Splunk installation, and our certificate is at /opt/splunk/etc/auth/splunkweb/cert.pem. We can get the SHA256 fingerprint for the certificate using the the x509 subcommand for openssl, which deals with X.509 formatted certificates:
[root@splunk ~]# cd /opt/splunk/etc/auth/splunkweb/
[root@splunk splunkweb]# openssl x509 -fingerprint -sha256 -noout -in cert.pem
SHA256 Fingerprint=E3:A1:34:2E:2C:4B:98:3B:E6:80:E1:1E:0A:36:2F:03:92:11:FD:53:DD:C8:E2:F0:5F:1B:80:E7:84:85:72:99
[root@splunk splunkweb]#
From the output above, we can see that our certificate’s fingerprint is E3:A1:34:2E:2C:4B:98:3B:E6:80:E1:1E:0A:36:2F:03:92:11:FD:53:DD:C8:E2:F0:5F:1B:80:E7:84:85:72:99. Next, we’ll compare this to what our web browser sees to verify that we are seeing the real certificate when we connect via our web browser.
Checking the Fingerprint with FireFox
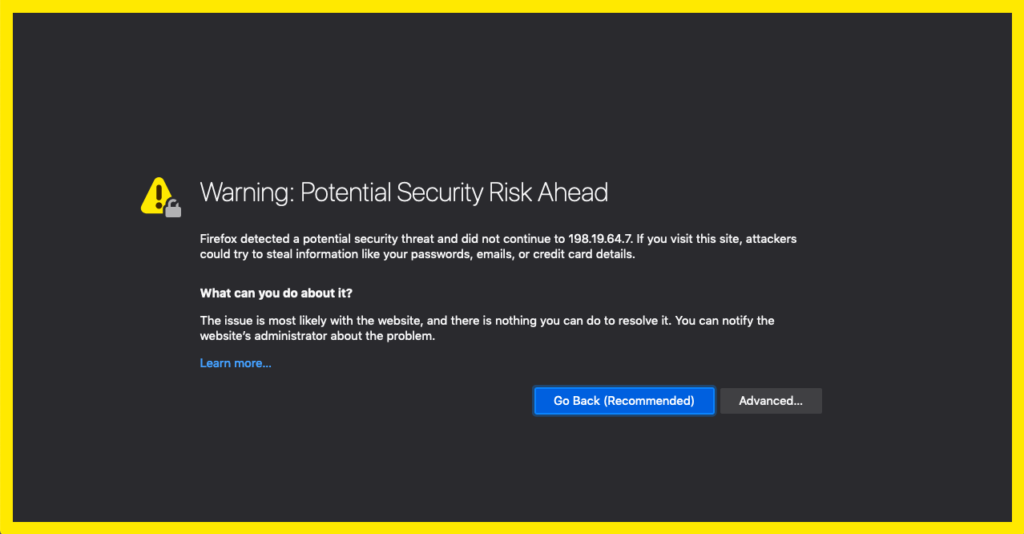
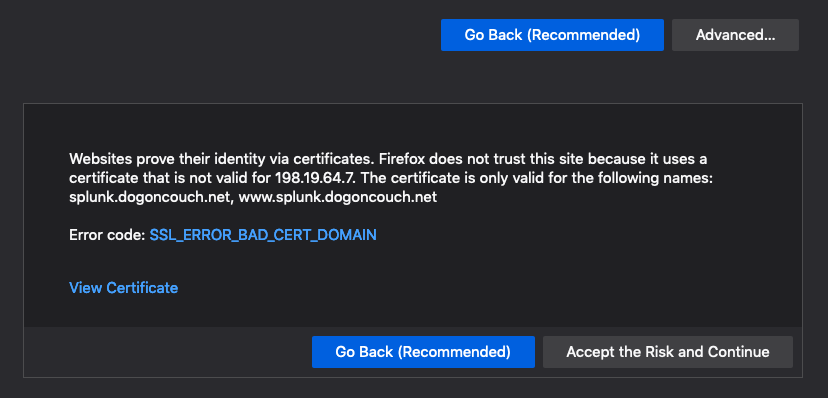
We’re going to connect to the server by IP instead of by fully qualified domain name (FQDN), which will cause FireFox to show us a warning, since the certificate on the server is only valid for the server’s FQDN. This is similar to the warning we would get if the server presented a self signed certificate; we don’t have a trust chain, but we can still verify the certificate’s fingerprint and know that we are connecting to the right server.
This is the warning that we see when we connect to the server:
If we click “Advanced” to get more information on the security issue, this is what we see:
We’ll click “View Certificate” to look at the contents of the certificate, which will include the fingerprint:
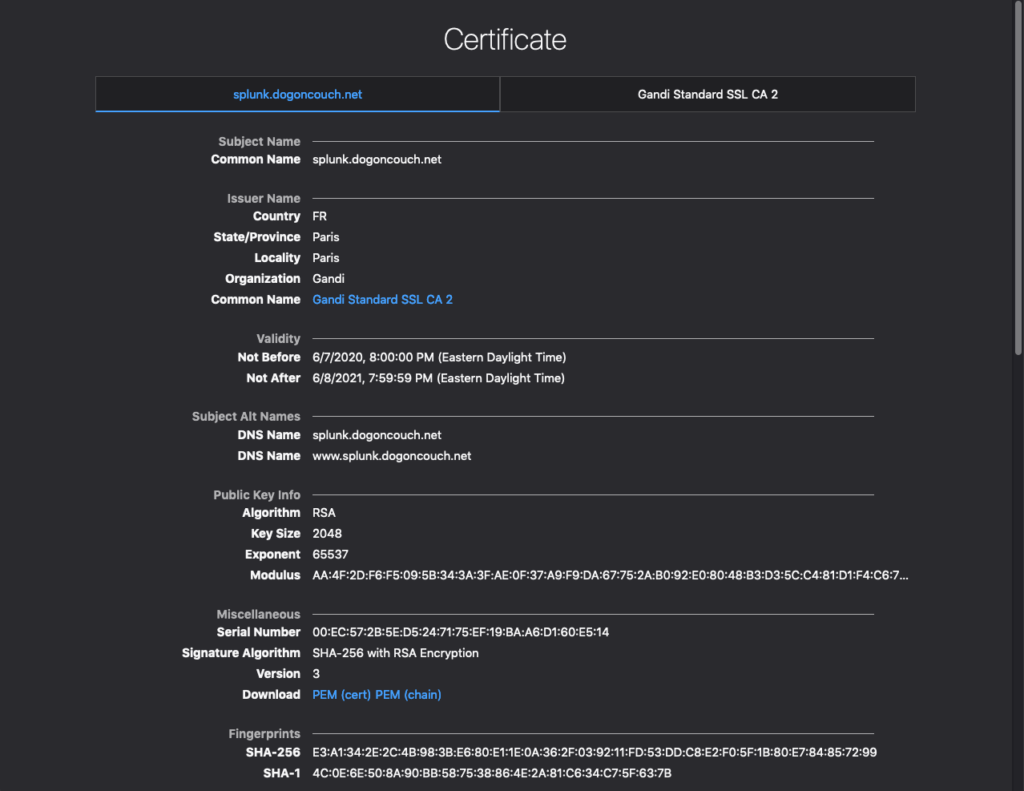
We can see the certificate’s attributes, some information about the issuing CA, and at the bottom we can see its SHA-256 fingerprint. When we compare it to the fingerprint we saw above with openssl on the command line, we can see that the fingerprints are the same, so we know we are connecting to the right server.
Conclusion
By verifying a certificate’s SHA256 fingerprint, we were able to verify the identity of a server based on the certificate even in a situation where our web browser could not. This process can be useful when working on servers that have certificates that are not valid for some reason; they could be self-signed, expired, valid for a different FQDN, or signed by a CA that your browser doesn’t recognize. Web browsers have a strict set of criteria that needs to be met in order for the browser to trust a certificate, but even in situations where not all of those criteria are met, it is possible to verify a server’s identity with certificate fingerprints.
